Automation is a powerful capability in Oracle APEX that allows you to run background logic on a scheduled basis or based on events such as inserts, updates, or deletes. With the release of newer APEX versions (especially 22.x onward), Oracle APEX automation has become more declarative, feature-rich, and well-integrated with other APEX and database components.
This blog post explores the architectural foundation of APEX Automation, how it works, and how to design robust, scalable, and low-code automation solutions in Oracle APEX.

What is APEX Automation?
Oracle APEX Automation is a background process that can be configured to run logic such as sending email alerts, performing validations, synchronizing data, or even triggering external REST APIs based on a defined schedule or data change.
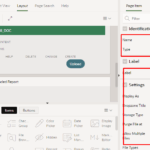
You can find it under Shared Components > Automations.
It enables you to define the following:
- Source: Table/View/SQL
- Event: Schedule-based or DML-based (Insert, Update, Delete)
- Actions: PL/SQL block, Send Email, Call Web Service, Raise Alert, etc.
- Conditions: Declarative filters
- Error handling and Logging
How Oracle APEX Automation Works
Oracle APEX automation uses the DBMS_SCHEDULER in the backend. A job is created based on the automation settings, and APEX handles the orchestration. Here’s what happens under the hood:
- The Automation configuration is stored in APEX metadata tables .
- A background job (scheduler) runs at the defined interval or triggers on DML.
- For each qualifying record, APEX performs the defined actions in sequence.
- Logging is managed through the
APEX_AUTOMATION.LOG_INFO. - You can monitor runs through the Automation Logs section in APEX Builder.
Architecture Diagram (Conceptual)
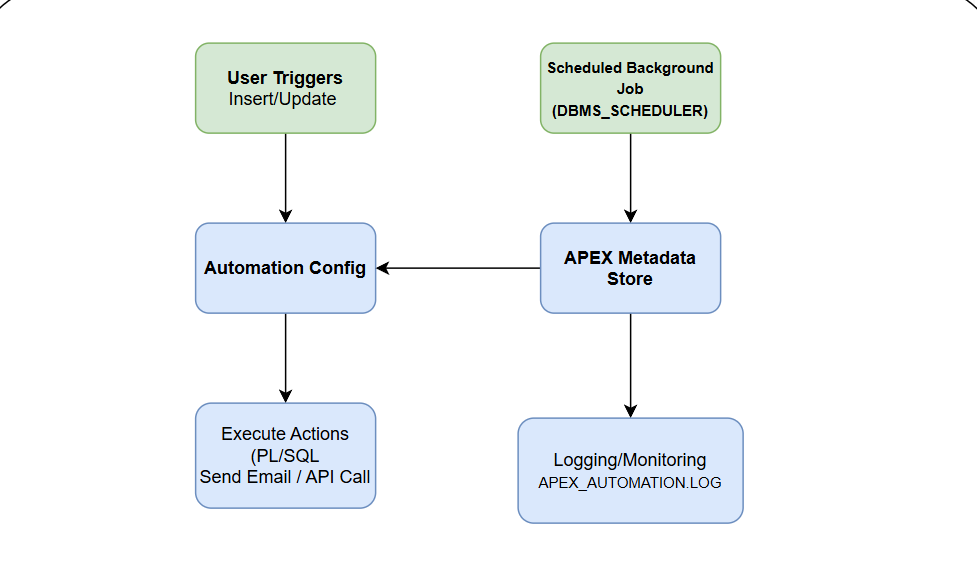
Step-by-Step Breakdown
1. User Triggers / DB Changes
- Automations can be triggered either:
- Manually by a user action (e.g., record insert/update).
- Or automatically through scheduled jobs using
DBMS_SCHEDULER.
2. Scheduled Background Job
- Oracle APEX creates a DBMS_SCHEDULER job behind the scenes.
- This job checks the automation’s SQL query condition at scheduled intervals.
- If data is returned, the automation is triggered.
3. Automation Configuration
- You define:
- Triggering SQL Query
- PL/SQL Actions, email notifications, REST/API calls, etc.
- Schedule (Daily, Hourly, etc.)
- These settings are stored in the APEX metadata repository.
4. APEX Metadata Store
- All automations and their configurations are stored in APEX internal tables.
- The automation engine refers to these definitions during execution.
5. Execute Actions
- Based on the returned rows from your SQL query, the following happens:
- Each row can trigger PL/SQL logic.
- You can send an email, call a REST API, or update another table.
- Supports conditional logic like:
IF :STATUS = 'INACTIVE' THEN
APEX_AUTOMATION.SKIP_CURRENT_ROW;
END IF;
Key Features of Oracle APEX Automation
Oracle APEX Automation provides a powerful, low-code workflow engine to manage background processes and system integrations with minimal effort. Below are its core features, along with how they work in practice.
1. Declarative Process Handling
Automations in APEX are declarative by design, allowing you to define actions without heavy coding. You can send emails, execute PL/SQL blocks, or invoke REST APIs through a simple configuration interface.
How It Works:
- Navigate to Shared Components → Automations.
- Define your data source (SQL query, table, or view).
- Choose the trigger type: Scheduled or DML-based.
- Add actions like Send Email, PL/SQL Block, or Invoke REST Service.
2. PL/SQL Integration
For advanced logic, APEX allows embedding custom PL/SQL code inside automation steps, ensuring maximum flexibility.
How It Works:
- Add a PL/SQL Code action in your automation.
- Write custom logic or call existing stored procedures.
- Apply conditional processing using APIs such as
SKIP_CURRENT_ROW.
3. APEX Scheduler (DBMS_SCHEDULER Integration)
APEX leverages Oracle DBMS_SCHEDULER to manage background jobs seamlessly.
How It Works:
- When you configure a scheduled automation, APEX automatically creates a DBMS_SCHEDULER job.
- The job runs at configured intervals (hourly, daily, or custom).
- No manual database job creation is required—APEX handles it internally.
4. RESTful Services / ORDS Integration
APEX Automations can consume or push data through REST APIs, enabling system-to-system communication.
How It Works:
- Define a RESTful Web Service in Shared Components.
- Add an Invoke Web Service action in your automation.
- Configure request parameters, headers, and authentication.
Example: Sync order details with an ERP system immediately after insertion.
5. Email and Notification Automation
Send email alerts or notifications automatically when specific data conditions are met.
How It Works:
- Add a Send Email action to your automation.
- Configure recipients, subject, and dynamic content using substitution variables like
&PRODUCT_NAME.. - Combine with conditions to ensure only relevant emails are sent.
Example: Notify the purchasing team when inventory falls below a threshold.
6. Scheduled Report Generation
Deliver PDF or Excel reports automatically at regular intervals.
How It Works:
- Create a report (Interactive Report, Classic Report, or SQL-based).
- Use
APEX_DATA_EXPORTto generate the report programmatically. - Attach the report in a Send Email action for scheduled delivery.
Use Case: Send a daily sales report to managers every morning.
7. REST Source Synchronization
APEX 24.2 introduces native REST data synchronization for automations.
How It Works:
- Define a REST Data Source in Shared Components.
- Create an automation to fetch and merge data into APEX tables.
- Schedule it at intervals for seamless integration with external systems.
Example: Automatically sync currency exchange rates every 4 hours.
8. Logging and Monitoring
Track automation activity using built-in logging APIs and monitoring tools.
How It Works:
- Use Automation Logs in APEX Builder to review execution history.
- Add custom logs inside PL/SQL using:
APEX_AUTOMATION.LOG_INFO('Processed successfully');
APEX_AUTOMATION.LOG_WARN('Warning: Missing email address');
APEX_AUTOMATION.LOG_ERROR('Error: Failed to call API');
- Logs help with debugging, auditing, and performance monitoring.
9. On-Demand Automations
Execute automations immediately without waiting for their schedule.
How It Works:
- Use the
APEX_AUTOMATION.EXECUTEAPI in PL/SQL or via a button click:
APEX_AUTOMATION.EXECUTE('automation_static_id');- Ideal for real-time workflows triggered by user actions or file uploads.
APEX Automation Utility API Samples
Here are common built-in procedures you can use inside your PL/SQL action block:
LOG_INFO – Record Informational Messages During Automation Execution
This API is used to log general information or status updates while an automation is running. These messages help track the flow of execution and confirm successful processing of records.
Use Case:
When you want to document normal operations, such as confirming that a record was processed successfully or noting progress in a multi-step process, LOG_INFO is ideal for monitoring and debugging.
BEGIN
  APEX_AUTOMATION.LOG_INFO(p_message => 'Processing record XYZ completed');
END;
LOG_WARN – Record Warning Messages During Automation Execution
This API is used to log non-critical issues or warnings that occur during an automation process. These warnings do not stop the execution but serve as indicators for potential problems that may need attention.
Use Case:
When a scenario occurs that doesn’t break the process but requires review—such as missing optional data (e.g., an email address)—LOG_WARN helps track these situations for better system monitoring.
BEGIN
  APEX_AUTOMATION.LOG_WARN(p_message => 'Warning: Missing email address');
END;
LOG_ERROR – Record Critical Errors During Automation Execution
This API is used to log error messages when a failure occurs in an automation process. These messages are stored in the automation log for troubleshooting and auditing purposes. It is particularly useful for capturing critical failures that need immediate attention.
Use Case:
When an action fails, such as an email not being sent or an external API call returning an error, LOG_ERROR ensures that the issue is logged for further investigation without stopping the automation entirely.
BEGIN
  APEX_AUTOMATION.LOG_ERROR(p_message => 'Error: Failed to send email');
END;
SKIP_CURRENT_ROW – Skip Processing for a Specific Record
This command is used within a PL/SQL action to bypass execution for the current row when it does not meet the processing criteria. The automation will continue with the remaining rows.
If certain records should not be processed (e.g., customers marked as inactive, orders on hold), you can skip them without stopping the entire automation run.
IF :STATUS = 'INACTIVE' THEN
  APEX_AUTOMATION.SKIP_CURRENT_ROW;
END IF;
EXIT or TERMINATE Automation
This code snippet stops the automation run in a controlled manner when a specific condition is met. Unlike TERMINATE, it allows the current process to exit cleanly without forcefully aborting the session.
When certain conditions indicate that further processing is unnecessary (e.g., no eligible records, validation failure), you can exit gracefully without impacting the system state.
IF l_stop_flag THEN
  APEX_AUTOMATION.EXIT;
END IF;
TERMINATE – Forcefully stop a running automation:
This PL/SQL block forcefully stops a currently running automation identified by its static ID (new_order_alert). It uses the APEX_AUTOMATION.TERMINATE API when you need to immediately halt automation execution, such as in cases of unexpected errors or business rule changes.
Key Point:
Unlike EXIT, which stops gracefully during processing, TERMINATE completely aborts the automation.
BEGIN
  APEX_AUTOMATION.TERMINATE(p_static_id => 'new_order_alert');
END;
RESCHEDULE Automation Programmatically
his PL/SQL block updates the schedule of an existing APEX Automation identified by its static ID (new_order_alert). It uses the APEX_AUTOMATION.RESCHEDULE API to change the automation’s execution frequency.
In this example:
p_static_id='new_order_alert'→ The automation to be updated.p_repeat_interval='FREQ=HOURLY;INTERVAL=2'→ Sets the automation to run every 2 hours.
Use Case:
If business requirements change (e.g., run automation more frequently), you can reschedule it dynamically without deleting and recreating the automation.
BEGIN
  APEX_AUTOMATION.RESCHEDULE(
    p_static_id        => 'new_order_alert',
    p_repeat_interval  => 'FREQ=HOURLY;INTERVAL=2'
  );
END;
Example Use Case: Automated Invoice Reminder for Overdue Payments
Imagine you have a Finance application built on Oracle APEX where customers receive invoices. You want to automatically send reminders when an invoice is overdue by more than 7 days.
Source:INVOICES table with columns: INVOICE_ID, CUSTOMER_EMAIL, DUE_DATE, STATUS.
Condition:STATUS = 'PENDING' AND DUE_DATE < SYSDATE - 7
Action:
- Send Email → Subject: “Payment Reminder for Invoice &INVOICE_ID”
- Log the Action → Using
APEX_AUTOMATION.LOG_INFO('Reminder sent for Invoice ' || :INVOICE_ID)
Bonus: You can log this using APEX_AUTOMATION.LOG_INFO().
Best Practices
- Keep your PL/SQL actions modular by calling procedures.
- Always log errors for traceability.
- Test automation manually before going live.
- Use conditions to avoid processing unwanted rows.
- Monitor automation logs regularly.
Conclusion
Oracle APEX Automation offers powerful capabilities to automate backend and frontend workflows with minimal coding. With declarative tools and deep integration into the Oracle Database and APEX ecosystem, you can automate almost anything—from syncing data, sending alerts, to handling complex workflows.
Design smart. Automate wisely.