A complete, real-world, file-based integration architecture
Introduction
Oracle Fusion Applications store very important and sensitive business data. However, they are not meant to be accessed directly by custom applications or reporting tools like Oracle APEX. Trying to query Fusion data directly can slow down the system, create security risks, and cause support issues—things that enterprise systems cannot afford.
Because of this, organizations need a safe and reliable way to use Fusion data for reporting and custom applications without touching Fusion at runtime.
This blog explains a practical, real-world architecture to copy data from Oracle Fusion into Oracle Autonomous Transaction Processing (ATP) and then use that data in Oracle APEX. With this approach, Fusion continues to handle transactions, while ATP and APEX handle reporting and custom logic—without affecting Fusion performance
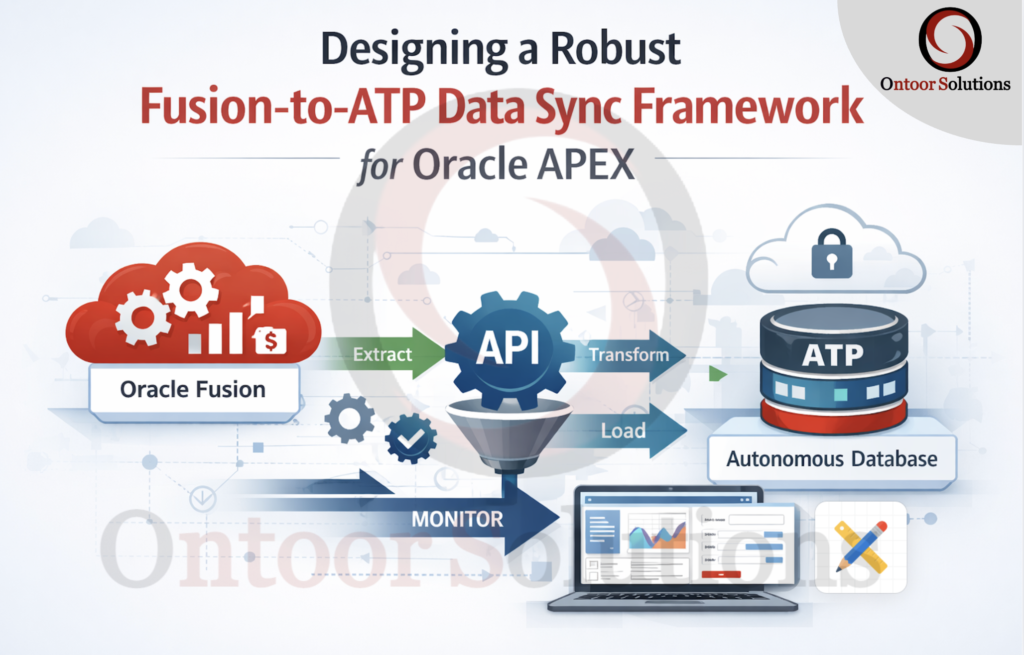
Architecture Overview
The data flow follows a multi-stage approach to ensure reliability and performance:
- Extract: Fusion BI Publisher generates incremental CSV files.
- Transport: Files are pushed to an SFTP server and then moved to OCI Object Storage via Oracle Integration Cloud (OIC).
- Ingest: A PL/SQL procedure in the ATP database uses
DBMS_CLOUDto pull data into a staging table. - Merge: Data is synchronized from the staging table to the final target table.
Step 1: Create the Data Model
The first step is to define the data source and the query that will extract the incremental data.
- Navigate to the Catalog in Oracle Fusion BI Publisher.
- Click on Create and select Data Model.
- In the Data Model editor, click on New Data Set and select SQL Query.
- Give your data set a name (e.g.,
Source_Data), select the appropriate Data Source (e.g.,ApplicationDB_FSCM), and enter your SQL query. - The query should include a
WHEREclause to filter for data modified within a specific timeframe to ensure incremental extraction.
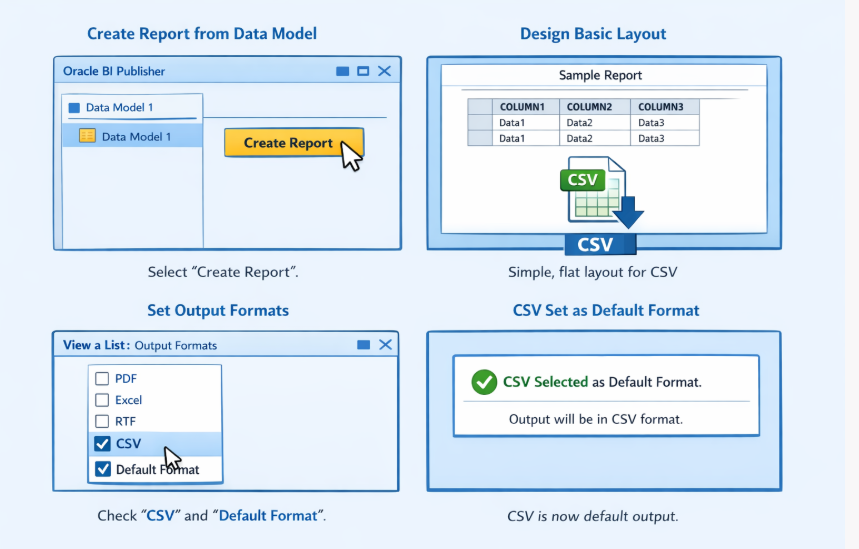
Step 2: Create the Report Layout
Once the data model is saved, you need to create a report that uses this data model and specifies the output format.
- From the data model, click on Create Report.
- Follow the wizard to create a basic report layout. Since the output will be a CSV file for machine processing, a simple, generic layout is sufficient.
- In the report editor, click on View a List to see the available output formats.
- Ensure that CSV is selected as an output format. It’s a good practice to set it as the Default Format.
Step 3: Schedule the Report
The next crucial step is to schedule the report to run at a high frequency and deliver the output to an SFTP server.
- Locate your saved report in the catalog and click on Schedule.
- In the Schedule tab, define the frequency. For near real-time synchronization, a frequency of every 5 to 10 minutes is recommended.
- In the Output tab, configure the destination. Select FTP as the Destination Type.
- Choose your registered FTP Server, specify the Remote Directory, and provide a Remote File Name. Use a dynamic filename (e.g., with a timestamp) to prevent overwriting and to create an audit trail.
Step 4: Monitor the Job History
After scheduling the report, it’s important to monitor its execution to ensure data is being extracted and delivered successfully.
- Navigate to the Report Job History page in BI Publisher.
- Search for your scheduled report job.
- Verify that the job’s Status is Success for each execution. You can also check the start and end times to confirm the schedule frequency.
Next Steps:
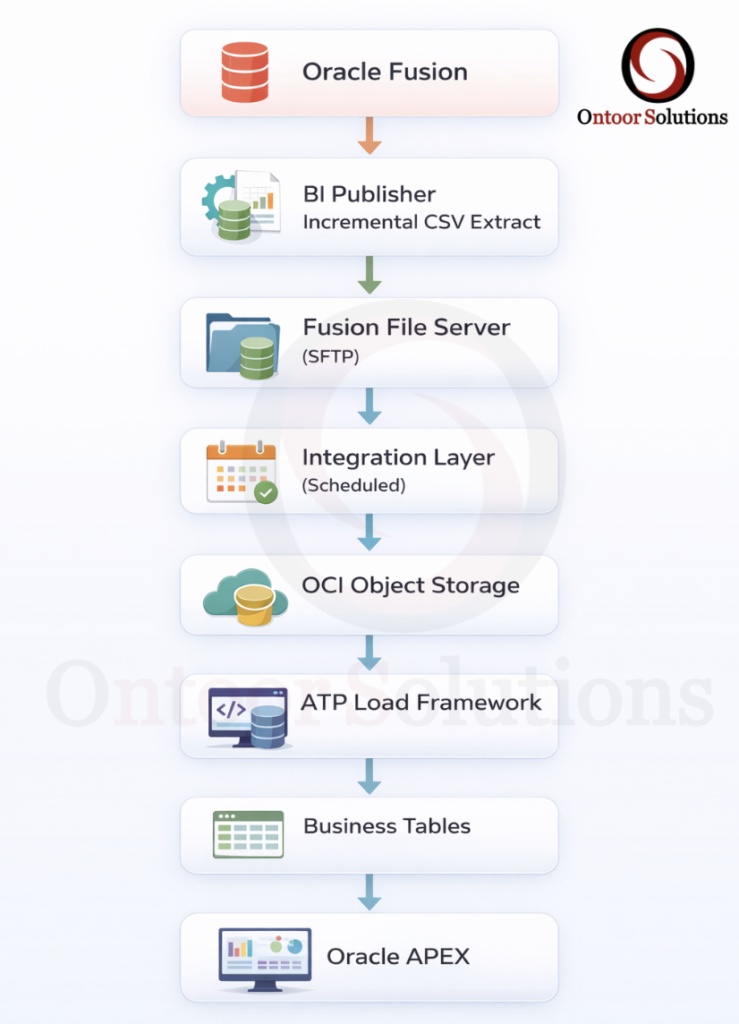
After successfully configuring the BI Publisher report to deliver incremental CSV files to the SFTP server, the subsequent steps in the data synchronization pipeline are:
- Oracle Integration Cloud (OIC): Create an integration that periodically polls the SFTP server, picks up the new CSV files, and uploads them to an OCI Object Storage bucket.
- Autonomous Transaction Processing (ATP): Develop a PL/SQL procedure that uses
DBMS_CLOUD.COPY_DATAto load the data from the Object Storage bucket into a staging table. - Data Merge: Implement a
MERGEstatement within the PL/SQL procedure to synchronize the data from the staging table to the final target table, handling both inserts and updates.
High-Level Architecture
Integration Layer – Moving Files Out of Fusion
Role of the Integration Layer
The integration layer acts as a neutral courier between Oracle Fusion Applications and downstream platforms.
Its responsibility is limited to file movement, reliability, and isolation—not data transformation or business logic.
In this architecture, the integration layer performs the following functions:
- Periodically polls the Fusion SFTP location
- Identifies and picks up eligible incremental CSV files
- Transfers files to OCI Object Storage
- Handles retries, failures, and transient connectivity issues
- Operates independently of the ATP database
By running asynchronously, the integration layer ensures that neither Fusion nor ATP is impacted by temporary outages or processing delays.
Why This Layer Is Critical
A direct Fusion → ATP connection introduces tight coupling between a transactional system and a reporting database. Such designs are fragile and difficult to recover from failures.
Introducing an integration layer:
- Isolates Fusion from downstream processing issues
- Prevents ATP availability from affecting Fusion schedules
- Enables controlled, retryable, and auditable file movement
This separation is essential for building a resilient and supportable enterprise integration.
Step 5: Object Storage as a Decoupling Layer
OCI Object Storage serves as the central buffering and decoupling layer in the pipeline.
It is not just a storage destination—it is a fault-tolerance mechanism.
Example Bucket:
fusion-data-dropzoneWhy Object Storage Is Mandatory
Each extracted CSV file is stored as an immutable object, creating a durable checkpoint between systems.
Using Object Storage provides several architectural guarantees:
- Buffers data between the producer (Fusion) and the consumer (ATP)
- Enables replay and recovery without re-extracting data
- Prevents partial or inconsistent database loads
- Fully decouples Fusion availability from ATP processing
Object Storage makes the pipeline fault-tolerant.
Step 6: Sample Object Storage URL (For Understanding)
https://objectstorage.ap-mumbai-1.oraclecloud.com
/n/demo_namespace/b/fusion-data-dropzone/o/daily_extracts/supplier_profile_20260121.csv
This example illustrates:
- Logical folder organization
- Time-based file naming
- How ATP later references the file for ingestion
Step 7: Creating Database Credential in ATP
ATP accesses Object Storage using DBMS_CLOUD credentials.
BEGIN
  DBMS_CLOUD.CREATE_CREDENTIAL(
    credential_name => 'OBJ_STORE_CRED',
    username        => 'oci_user@example.com',
    password        => 'OCI_AUTH_TOKEN'
  );
END;
/
Secure Access from ATP to Object Storage
Autonomous Transaction Processing (ATP) accesses Object Storage using DBMS_CLOUD credentials.
These credentials are stored securely inside the database and referenced by name during data load operations.
Architectural Characteristics
- Uses OCI Auth Tokens, not OCI user passwords
- Created once and centrally managed
- Reused across multiple load jobs
- Keeps credentials out of PL/SQL code and application logic
This approach follows Oracle security best practices and ensures that database code remains clean, secure, and portable.
Architectural Outcome
At this stage of the pipeline:
- Fusion remains isolated from downstream systems
- File movement is asynchronous and retry-safe
- Data ingestion is secure and credential-managed
- The foundation is ready for staging and merge operations in ATP
This prepares the architecture for the next phase—loading data into ATP staging tables and synchronizing it into final business tables.
Step 8: Listing Files from Object Storage
Before any data is loaded into ATP, the framework performs a pre-load discovery step to identify which files are available for processing in OCI Object Storage.
SELECT object_name,
       bytes,
       last_modified
FROM   DBMS_CLOUD.LIST_OBJECTS(
         credential_name => 'OBJ_STORE_CRED',
         location_uri    =>
           'https://objectstorage.ap-mumbai-1.oraclecloud.com/n/demo_namespace/b/fusion-data-dropzone/o/daily_extracts/'
       );
Rather than assuming the presence of files, the system explicitly queries the Object Storage bucket to retrieve metadata such as:
- File names
- File sizes
- Last modified timestamps
This discovery step ensures that the data load process is intentional, traceable, and controlled.
Why This Step Is Important
Listing objects from Object Storage enables several critical architectural capabilities:
- Validation
Confirms that expected extract files are present before attempting a load. - Logging and Auditing
Captures which files were detected, processed, or skipped during each run. - Operational Debugging
Helps quickly diagnose missing, delayed, or duplicate files without rechecking Fusion or SFTP. - Idempotent Processing
Supports safe re-runs by allowing the framework to decide which files should be processed again.
Step 9: Raw Landing (Staging) Table Design
Example Table
CREATE TABLE supplier_raw_load (
  supplier_id        VARCHAR2(2000),
  supplier_name      VARCHAR2(2000),
  supplier_status    VARCHAR2(2000),
  last_update_date   VARCHAR2(2000)
);
The raw landing table is the initial ingestion layer for files loaded from Object Storage.
Its only responsibility is to accept data without rejection.
Design Characteristics
- Column order must exactly match the CSV structure
- All columns defined as
VARCHAR2 - No primary keys or constraints
- No indexes
- No validation logic
Rationale
File ingestion must be deterministic and failure-free.
Data validation and transformation are deferred to downstream processing steps.
Step 10: Copying Data from Object Storage into ATP
Data is loaded into the raw landing table using DBMS_CLOUD.COPY_DATA, which is the supported bulk-load mechanism for ingesting files from OCI Object Storage into Autonomous Transaction Processing (ATP).
BEGIN
  DBMS_CLOUD.COPY_DATA(
    table_name      => 'SUPPLIER_RAW_LOAD',
    credential_name => 'OBJ_STORE_CRED',
    file_uri_list   =>
      'https://objectstorage.ap-mumbai-1.oraclecloud.com/n/demo_namespace/b/fusion-data-dropzone/o/daily_extracts/supplier_profile_20260121.csv',
    format          => JSON_OBJECT(
                         'type'        VALUE 'csv',
                         'skipheaders' VALUE '1',
                         'delimiter'   VALUE ',',
                         'trimspaces'  VALUE 'true'
                       )
  );
END;
/
The procedure reads the CSV file directly from Object Storage and inserts the data into the raw staging table in a single operation.
Why DBMS_CLOUD.COPY_DATA
- Optimized for bulk data loading
- Designed for large file ingestion
- Avoids row-by-row processing
- Provides predictable and repeatable load behavior
Architectural Outcome
- Fast and reliable ingestion into ATP
- No dependency on application-level insert logic
- Clean separation between file ingestion and data processing
Step 11: Business Target Table Design
CREATE TABLE supplier_profile_master (
  supplier_id        VARCHAR2(100) PRIMARY KEY,
  supplier_name      VARCHAR2(500),
  supplier_status    VARCHAR2(50),
  last_update_date   DATE,
  active_flag        CHAR(1)
);
The business target table stores cleaned and typed data optimized for Oracle APEX reporting and query performance.
It represents the consumable layer, not a transactional system of record.
Design Characteristics
- Proper data types applied (
DATE, boundedVARCHAR2) - Primary key defined for uniqueness
- Minimal constraints, focused on read efficiency
- Structured for reporting and analytics use cases
Step 12: Merge (Upsert) Logic
Data from the raw landing table is synchronized into the business table using a MERGE-based upsert pattern.
MERGE INTO supplier_profile_master tgt
USING (
  SELECT supplier_id,
         supplier_name,
         supplier_status,
         TO_DATE(last_update_date,'YYYY-MM-DD') last_update_date
  FROM   supplier_raw_load
) src
ON (tgt.supplier_id = src.supplier_id)
WHEN MATCHED THEN
  UPDATE SET
    tgt.supplier_name    = src.supplier_name,
    tgt.supplier_status  = src.supplier_status,
    tgt.last_update_date = src.last_update_date,
    tgt.active_flag      = 'Y'
WHEN NOT MATCHED THEN
  INSERT (
    supplier_id,
    supplier_name,
    supplier_status,
    last_update_date,
    active_flag
  )
  VALUES (
    src.supplier_id,
    src.supplier_name,
    src.supplier_status,
    src.last_update_date,
    'Y'
  );
Why MERGE Is Used
- Idempotent processing
- Safe for repeated executions
- Prevents duplicate records
- Supports incremental synchronization
Architectural Outcome
- Consistent target state after every run
- Controlled handling of inserts and updates
- Reliable recovery and reprocessing
- The target table always converges to the correct state, regardless of how many times the job runs
Step 13: Handling Deleted / Missing Records
After a file has been successfully loaded into the raw landing table and merged into the business target table, it must be removed from OCI Object Storage.
Why Files Are Deleted Post-Merge
- Prevents duplicate processing
- Clearly marks files as completed
- Controls storage growth
- Simplifies operational monitoring
File deletion acts as a processing acknowledgment, not a data deletion signal
BEGIN
  DBMS_CLOUD.DELETE_OBJECT(
    credential_name => 'OBJ_STORE_CRED',
    object_uri      => 'https://objectstorage.ap-mumbai-1.oraclecloud.com
                        /n/demo_namespace/b/fusion-data-dropzone/o/daily_extracts/supplier_profile_20260121.csv',
    force           => FALSE
  );
END;
/
Parameter Explanation
- credential_name
DBMS_CLOUD credential created using OCI Auth Token - object_uri
Full Object Storage URI of the processed file - force = FALSE
Ensures controlled deletion (recommended)
Step 14: Logging & Audit Framework
A dedicated logging table tracks the lifecycle of every file processed by the pipeline.
This table provides operational visibility, not business reporting.
Example Log Table
The log captures:
- File identity and source
- Processing start and end times
- Final execution status
- Error details, if any
Logging Strategy
- One log entry per file per execution
- Status recorded as SUCCESS or FAILURE
- Errors captured at the exact failure point
- Logs written before and after each major stage
CREATE TABLE data_sync_log (
  object_name   VARCHAR2(100),
  file_name     VARCHAR2(500),
  start_time    DATE,
  end_time      DATE,
  status        VARCHAR2(20),
  error_message VARCHAR2(4000)
);

INSERT INTO data_sync_log
VALUES (
  'SUPPLIER_PROFILE',
  'supplier_profile_20260121.csv',
  SYSDATE,
  NULL,
  'STARTED',
  NULL
);
Step 15: Exception Handling Pattern
Each data object is processed independently within its own execution scope.
Failures are captured and logged, not propagated to stop the entire pipeline.
Handling Strategy
- Wrap load and merge logic in a controlled exception block
- Update audit logs with SUCCESS or FAILED status
- Capture error details at the failure point
- Always record end time, regardless of outcome
BEGIN
  -- load & merge
  UPDATE data_sync_log
  SET status='SUCCESS', end_time=SYSDATE
  WHERE object_name='SUPPLIER_PROFILE';
EXCEPTION
  WHEN OTHERS THEN
    UPDATE data_sync_log
    SET status='FAILED',
        error_message=SQLERRM,
        end_time=SYSDATE
    WHERE object_name='SUPPLIER_PROFILE';
END;
/
Step 16: Cleanup & Repeatability
After successful processing of a data object:
- Raw landing tables may be truncated
- Processed files are either deleted or archived
- Execution moves to the next object
This ensures predictable and repeatable execution for every run.
Step 17: Oracle APEX Characteristics
Oracle APEX consumes data only from business target tables.
- Reads only curated business tables
- Never accesses raw staging tables
- Never reads files from Object Storage
- Never calls Fusion APIs at runtime
Result
- Fast reports
- Stable dashboards
- Zero runtime integration risk
Why This Architecture Works
- Incremental — processes only changed data
- Decoupled — no runtime dependency between Fusion, ATP, and APEX
- Replayable — files can be safely reprocessed from Object Storage
- Auditable — every file and run is logged and traceable
- Secure — no direct Fusion access; credentials are centrally managed
- Scalable — supports growing data volumes and additional objects
- APEX-friendly — optimized for fast, stable reporting