Oracle APEX Interactive Grids allow users to manipulate and interact with data efficiently. A common requirement is to automatically navigate to a specific column when a new row is added. This article explains how to create a dynamic action in Oracle APEX that focuses on a specific column in an Interactive Grid upon adding a new row, using JavaScript and the gotoCell method.
Creating the Dynamic Action
To create a dynamic action that navigates to a specific column when a new row is added, follow these steps:
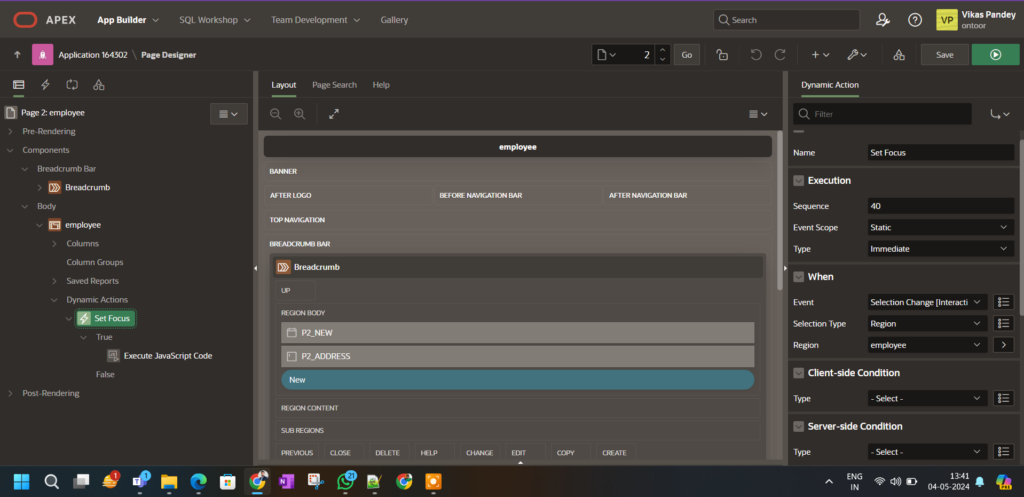
Step 1: Define the Dynamic Action
- Open Oracle APEX: Navigate to the page with your Interactive Grid in the Application Builder.
- Create a New Dynamic Action:
- In the “Dynamic Actions” section, click “+” to create a new dynamic action.
- Set the Event to “Selection Change [Interactive grid]” This event triggers when a different row in the Interactive Grid is selected.
- Choose “Execute JavaScript Code” as the Action.
- Set the Selection Type to “Region” and select your Interactive Grid.
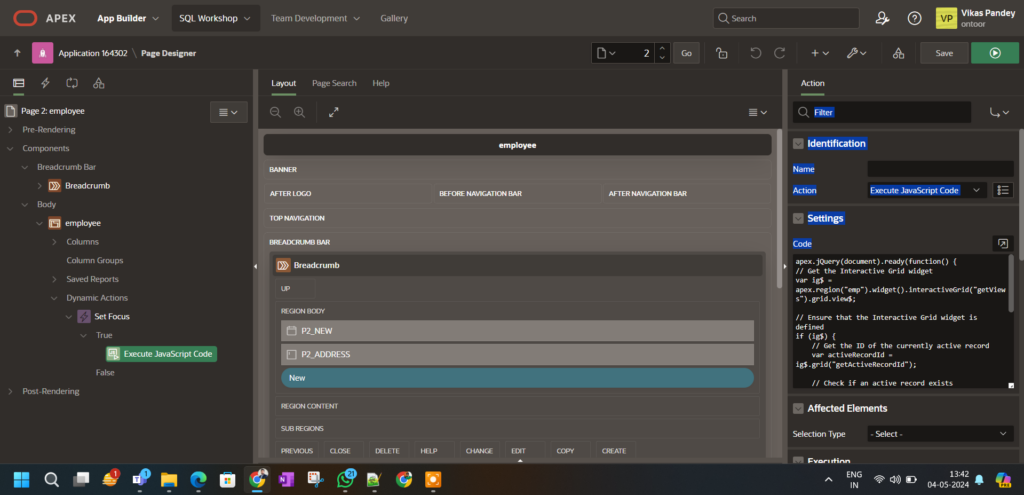
Step 2: Add the JavaScript Code
- Add the JavaScript Code: Insert the following JavaScript snippet to navigate to a specific column when the selection changes in the Interactive Grid:
apex.jQuery(document).ready(function() {
    // Get the Interactive Grid widget
    var ig$ = apex.region("YOUR_GRID_STATIC_ID").widget().interactiveGrid("getViews").grid.view$;

    if (ig$) { // Check if the Interactive Grid widget is defined
        // Get the ID of the active record
        var activeRecordId = ig$.grid("getActiveRecordId");

        if (activeRecordId) { // Ensure there's an active record
            // Define the column name (replace with your desired column name)
            var columnName = "SALARY";

            // Navigate to the specified cell in the active record
            ig$.grid("gotoCell", activeRecordId, columnName);
        } else {
            console.log("No active record found.");
        }
    } else {
        console.log("Interactive Grid is undefined.");
    }
});
- Explanation:
- Getting the Interactive Grid Widget: The code retrieves the Interactive Grid view to interact with its data.
- Getting the Active Record ID: It obtains the ID of the active record, typically the new row.
- Navigating to a Specific Column: Using the
gotoCellmethod, the code navigates to a specific column in the new row. - Error Handling: Basic checks ensure the Interactive Grid is defined and there’s an active record to prevent unexpected errors.
Step 3: Test the Dynamic Action
- Run the Page: After creating the dynamic action, test your Oracle APEX application by adding a new row in the Interactive Grid.
- Verify Navigation: Ensure the grid focuses on the specified column after the new row is added.
Additional Tips and Variations
- Handling Undefined Grid: The code snippet includes checks to ensure the Interactive Grid is properly initialized. This avoids errors if the grid isn’t fully loaded.
- Alternative Navigation Approach: You can also navigate to a specific column by obtaining a specific record and using
gotoCellto navigate to the desired column:
var ig = apex.region("YOUR_GRID_STATIC_ID").widget().interactiveGrid("getViews", "grid");
var lastRecord = ig.model.recordAt(ig.model.getTotalRecords() - 1); // Last added record
ig.view$.grid("gotoCell", lastRecord, "SALARY"); // Navigate to the specified column
Conclusion
Creating a dynamic action in Oracle APEX that navigates to a specific column when a new row is added can improve user experience and streamline data entry. By following the steps outlined in this guide, you can create a dynamic action that automatically focuses on the desired column in an Interactive Grid. If you encounter issues, ensure the JavaScript code is implemented correctly, the correct column name is specified, and the Interactive Grid is properly initialized.