Oracle APEX (Application Express) plugins are custom components that can be added to APEX pages to extend the functionality of the application. To create an APEX plugin, you will need to have an understanding of HTML, CSS, JavaScript, and PL/SQL. Here are the general steps to create an APEX plugin:
- Create a new plugin in the APEX builder by going to Shared Components > Plugins.
- Define the plugin attributes, such as the name, type and others.
- Create the PL/SQL package that will contain the plugin’s functions and procedures.
- Create the plugin’s JavaScript and CSS files.
- Add the plugin to a page by going to the page’s properties and selecting the plugin from the “Plugins” section.
- Test the plugin and make any necessary adjustments.
Let’s start building APEX plugins
here is an example of creating a simple APEX plugin that adds a button to a page and displays an alert message when the button is clicked:
- Create a new plugin in the APEX builder by going to Shared Components > Plugins,
- and clicking on the “Create” button. Fill out the form, such as the name and type of the plugin.
- Enter name, for example, “Sample Sweet Alert“
- Enter Internal Name
- Select Type as Dynamic Action
- Create the PL/SQL package that will contain the plugin’s functions and procedures.
CREATE OR REPLACE PACKAGE my_plugin
AS
   FUNCTION render_fn (p_dynamic_action   IN apex_plugin.t_dynamic_action,
                       p_plugin           IN apex_plugin.t_plugin)
      RETURN apex_plugin.t_dynamic_action_render_result;
END my_plugin;
/- Create the package body:
create or replace PACKAGE BODY my_plugin
AS
   FUNCTION render_fn (p_dynamic_action   IN apex_plugin.t_dynamic_action,
                       p_plugin           IN apex_plugin.t_plugin)
      RETURN apex_plugin.t_dynamic_action_render_result
   AS
      l_result   apex_plugin.t_dynamic_action_render_result;
   BEGIN
    APEX_JAVASCRIPT.ADD_LIBRARY(
        P_NAME        => 'js',
        P_DIRECTORY   => P_PLUGIN.FILE_PREFIX,
        P_VERSION     => NULL,
        P_KEY         => 'anything'
    );

   APEX_CSS.ADD_FILE(
        P_NAME        => 'css',
        P_DIRECTORY   => P_PLUGIN.FILE_PREFIX,
        P_VERSION     => NULL,
        P_KEY         => 'ssss'
    );
    l_RESULT.JAVASCRIPT_FUNCTION   := 'my_plugin.initialize';
    l_result.attribute_01          := p_dynamic_action.attribute_01;
    l_result.attribute_02          := p_dynamic_action.attribute_02;
    l_result.attribute_03          := p_dynamic_action.attribute_03;

      RETURN l_result;
   END render_fn;
END my_plugin;
- Create the plugin’s JavaScript file. This file will contain the JavaScript code that will be executed when the button is clicked.
var my_plugin = {
    initialize:function(){
    "use strict";

    var da=this;
    apex.debug.log('my_plugin.initialize',da);
    var message = da.action.attribute01;
    var title = da.action.attribute02;
    var icon = da.action.attribute03;
    console.log(message);

    function alert_fn (p_message){
        // swal(title, p_message);
        swal({
            title: title,
            text: p_message,
            icon: icon,
            });

    }

    alert_fn(message);
    }
}- Let’s invoke the external JS API. Sweet Alerts
- Refer to the API link to Plugin JS
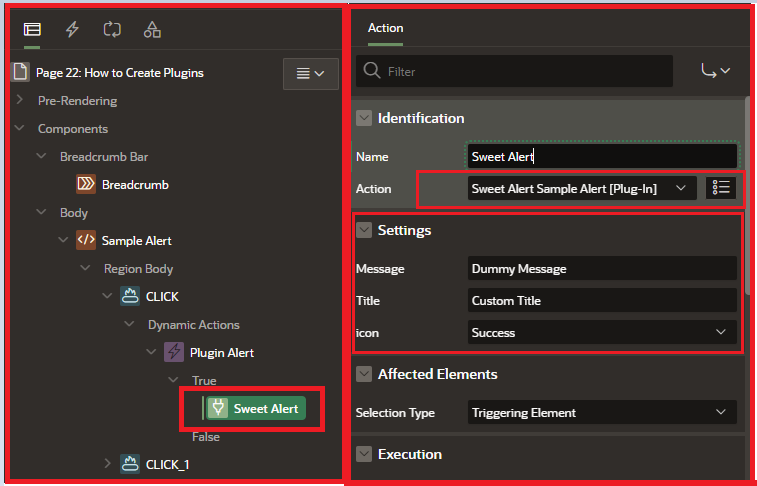
- Add the plugin to a page by going to the page’s properties and selecting the plugin from the “Plugins” section.
Let’s try to use it on the page.